Installation of Apache Hadoop 3.2.1 on Ubuntu

Hey guys,
In the previous articles (introduction to Hadoop Part 1–4), I had discussed Hadoop and Hadoop echo system to create a spark and fundamental understanding on Hadoop distributed computing environment. In this article, I will explain Hadoop 3.2.1 installation process (step by step) on Ubuntu 16.4. So, if you are excited to work on Hadoop cluster or interested to know about installation process of Hadoop, this article is for you.
We will see, how to install Apache Hadoop 3.2.1 step by step in standalone mode. But before installation of Hadoop, we will discuss pre-requisites to install Hadoop.
·Installation of Ubuntu 16.04 or later version (preferred).
· Create a username and password and login with sudo or root privilege into command line in the ubuntu, I have used hdoop user to login into Ubuntu.
· To update system run the following command (here $ indicates Ubuntu Command Line Prompt):
$ sudo apt update
· To check java version and confirm version of java, run following command
$ java -version
· If the java version is older than 1.8 then install java 1.8 or higher version. To install java 1.8 run following command:
$ sudo apt install openjdk-8-jdk -y
· The ssh command delivers a secure encrypted connection between two hosts over an insecure network. To install OpenSSH on Ubuntu run following command:
$ sudo apt install openssh-server openssh-client -y
· To add user in the Hadoop Environment, run the following command:
$ sudo adduser hdoop
· To Provide sudo permission to added user
$ su — hdoop
It will prompt for password, so enter password.
· To verify current login, run the following command:
$ whoami
· To configure passwordless SSH for Hdoop user and create public/private key pairs run the following command:
$ ssh-keygen -t rsa -P ‘’ -f ~/.ssh/id_rsa
· To copy the public keys from id_rsa.pub to authorized_keys, run the following command:
$ cat ~/.ssh/id_rsa.pub >> ~/.ssh/authorized_keys
· To change the permissions to hdoop user, run the chmod command:
$ chmod 0600 ~/.ssh/authorized_keys
· To verify that the localhost setup is done properly using the hdoop user to SSH to localhost, run the following command:
$ ssh localhost
· To download Apache Hadoop-3.2.1 and untar Hadoop, run the following commands:
$ wget https://archive.apache.org/dist/hadoop/common/hadoop-3.2.1/hadoop-3.2.1.tar.gz
$ tar xzf hadoop-3.2.1.tar.gz
· To setup Apache Hadoop in standalone / single node / pseudo-distributed mode, the six environment configuration files need to edit. The configuration files are
1. .bashrc
2. hadoop-env.sh
3. core-site.xml
4. hdfs-site.xml
5. mapred-site-xml
6. yarn-site.xml
1. To configure the environment variables in .bashrc file, run the following command:
$ sudo nano ~/.bashrc
Edit the .bashrc file for the Hdoop user, and add the following Hadoop environment variables at the at end of .bashrc file, save changes and exit from the file.
#Hadoop Related Options
export HADOOP_HOME=/home/hdoop/hadoop-3.2.1
export HADOOP_INSTALL=$HADOOP_HOME
export HADOOP_MAPRED_HOME=$HADOOP_HOME
export HADOOP_COMMON_HOME=$HADOOP_HOME
export HADOOP_HDFS_HOME=$HADOOP_HOME
export YARN_HOME=$HADOOP_HOME
export HADOOP_COMMON_LIB_NATIVE_DIR=$HADOOP_HOME/lib/native
export PATH=$PATH:$HADOOP_HOME/sbin:$HADOOP_HOME/bin
export HADOOP_OPTS=”-Djava.library.path=$HADOOP_HOME/lib/native”
To apply changes to the current hadoop environment run the following command:
$ source ~/.bashrc
2. To make configuration changes in hadoop-env.sh file, java path is required. We can check java path with the following commands:
$ which javac
$ readlink -f /usr/bin/javac
Now, to edit hadoop-env.sh file run the following command:
$ sudo nano $HADOOP_HOME/etc/hadoop/hadoop-env.sh
Add the following code (java path) at the end of the file, save changes and exit.
export JAVA_HOME=/usr/lib/jvm/java-8-openjdk-amd64
3. To setup configuration changes in core-site.xml file, we need to add default path for the temporary directory and add HDFS URL. So, run the following command:
$ sudo nano $HADOOP_HOME/etc/hadoop/core-site.xml
Add the below lines in this file at the end of file (between “<configuration>” and “<”/configuration>” tag), save and exit.
<property>
<name>hadoop.tmp.dir</name>
<value>/home/hdoop/tmpdata</value>
<description>A base for other temporary directories.</description>
</property>
<property>
<name>fs.default.name</name>
<value>hdfs://localhost:9000</value>
<description>The name of the default file system></description>
</property>
4. To change configuration in hdfs-site.xml file, run the following command:
$ sudo nano $HADOOP_HOME/etc/hadoop/hdfs-site.xml
Add the below given lines in the hdfs-site.xml at the end (between “<configuration>” and “<”/configuration>”) to indicate the NameNode and DataNode directories, save and exit.
<property>
<name>dfs.data.dir</name>
<value>/home/hdoop/dfsdata/namenode</value>
</property>
<property>
<name>dfs.data.dir</name>
<value>/home/hdoop/dfsdata/datanode</value>
</property>
<property>
<name>dfs.replication</name>
<value>1</value>
</property>
#Above 1 indicates number of replication factor that is 1.
5. To make changes in mapred-site-xml file, run the following command:
$ sudo nano $HADOOP_HOME/etc/hadoop/mapred-site.xml
Add the following lines of code at the end of file (between “<configuration>” and “<”/configuration>”) to change the default MapReduce framework name value to yarn, save and exit.
<property>
<name>mapreduce.framework.name</name>
<value>yarn</value>
</property>
6. The yarn-site.xml is used to describe settings related to YARN which includes setting for Node Manager, Resource Manager, Containers, and Application Master. To make changes in yarn-site.xml file, run the following command:
$ sudo nano $HADOOP_HOME/etc/hadoop/yarn-site.xml
Add the following lines at the end of file (between “<configuration>” and “<”/configuration>”), save and exit.
<property>
<name>yarn.nodemanager.aux-services</name>
<value>mapreduce_shuffle</value>
</property>
<property>
<name>yarn.nodemanager.aux-services.mapreduce.shuffle.class</name>
<value>org.apache.hadoop.mapred.ShuffleHandler</value>
</property>
<property>
<name>yarn.resourcemanager.hostname</name>
<value>127.0.0.1</value>
</property>
<property>
<name>yarn.acl.enable</name>
<value>0</value>
</property>
<property>
<name>yarn.nodemanager.env-whitelist</name>
<value>JAVA_HOME,HADOOP_COMMON_HOME,HADOOP_HDFS_HOME,HADOOP_CONF_DIR,CLASSPATH_PERPEND_DISTCACHE,HADOOP_YARN_HOME,HADOOP_MAPRED_HOME</value>
</property>
So, now Hadoop is configured. It important to format NameNode first time. To format NameNode run the following command:
$ hdfs namenode -format
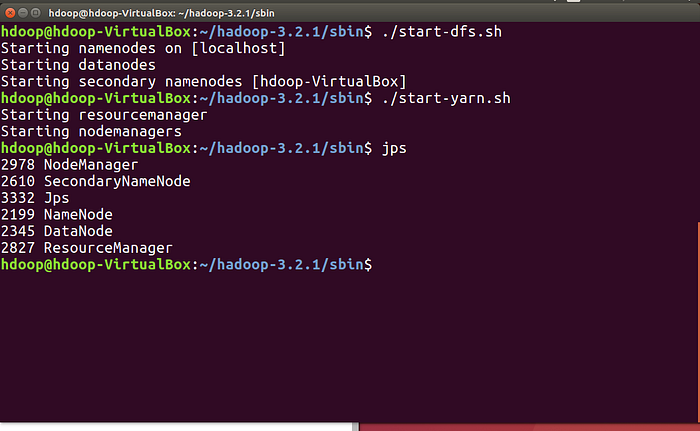
To start Hadoop cluster traverse to the ~/hadoop-3.2.1/sbin/ directory and execute the following commands. It will start the NameNode, DataNode and SecondaryNode.
$ cd ~/hadoop-3.2.1/sbin/
$ ./start-dfs.sh
To start the YARN resource and NodeManagers execute the following command:
$ ./start-yarn.sh
To check and verify all the Hadoop daemons are started, we can use the following command
$ jps
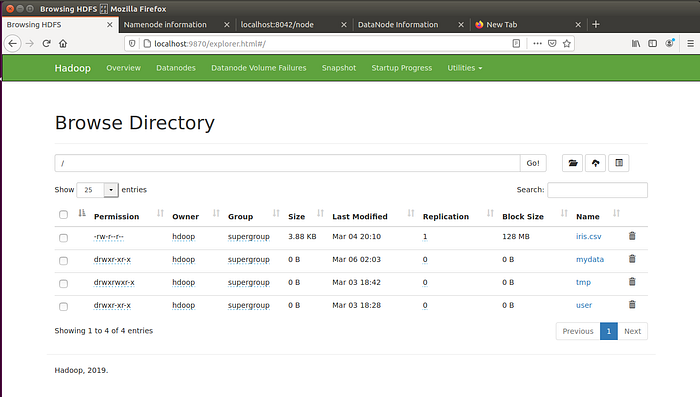
You can also access NameNode and YARN Resource Manager through browsers (Google Chrome/Mozilla Firefox). Hadoop NameNode runs on default port 9870. Run http://localhost:9870/ in the browser.
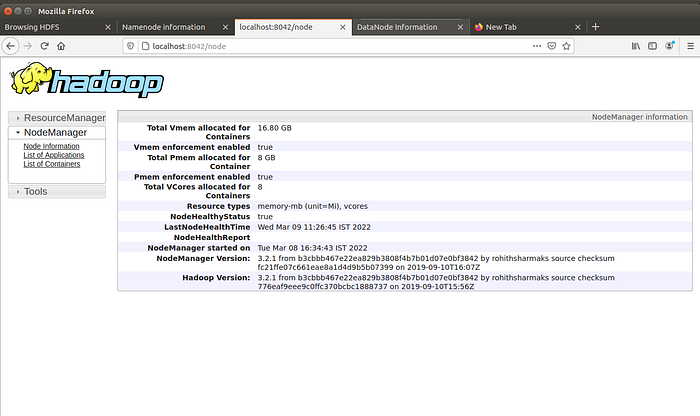
We can get information about the cluster and all applications by accessing port 8042. Run http://localhost:8042/ in the browser.
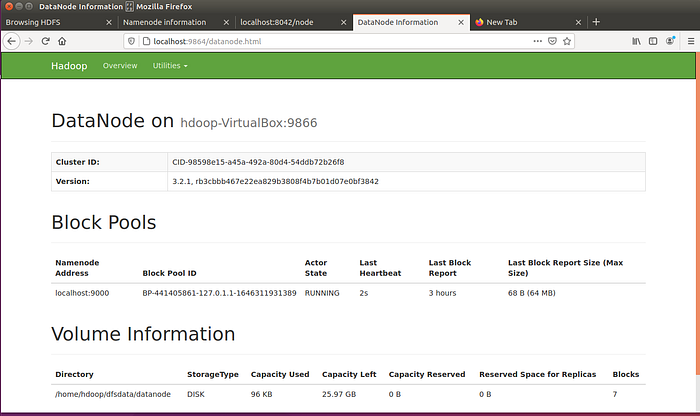
To get details of Hadoop node you can access port 9864. Run http://localhost:9864/ in the browser.
To stop services of Hadoop cluster, execute the following command:
$ ./stop-all.sh
Conclusion
Apache Hadoop is an open-source distributed file system framework that is most suitable for working on large data sets. A single node Apache Hadoop installation is an good starting point to explore HDFS environment and gain experience with Hadoop cluster.
On wrapping up notes, thank for the read and feel free to share your comments. Your comments will surely help me to present contents in a better way. See you next week.
Reference: https://hadoop.apache.org/docs/r3.2.1/